How Concrete Leveling Works: A Step-by-Step Guide
Learn exactly how concrete leveling works from initial assessment to finished results. A detailed walkthrough of the limestone slurry process.
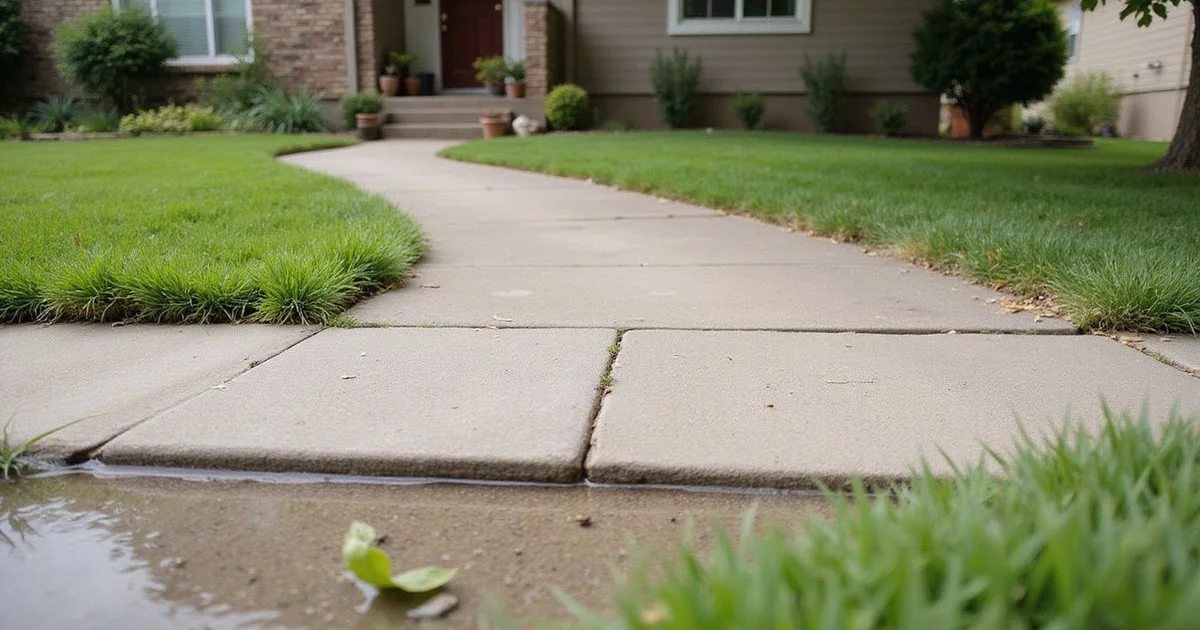
How most homeowners react to a sunken driveway or patio is something we see every day: they stare at the crack, shake their head, and wonder if they need to rip the whole thing out. It looks like a disaster, but from an engineering perspective, it is usually just a geometry problem caused by what is happening underneath the slab.
I’ve found that once people understand the physics behind leveling—that it’s really just hydraulic pressure fighting gravity—the solution feels a lot less intimidating.
From what I’ve seen in the field, this isn’t just about pumping mud under a rock. It is about calculating load distribution, managing soil mechanics, and restoring the structural integrity of your home’s hardscaping.
Here is exactly how we level concrete using our limestone slurry method at Colorado Springs Leveling, broken down from the initial site audit to the final cure.
Step 1: Initial Assessment and Diagnosis
Every project starts with a forensic evaluation of the slab because pumping material into a blind hole is a recipe for disaster. We don’t just look at the concrete; we look at the forces acting upon it. This assessment typically takes 30 to 45 minutes and relies on precise data collection to determine if the slab is salvageable.
What We Evaluate
Precise Elevation Mapping We use a ZipLevel Pro-2000 high-precision altimeter to map the slab’s topography. This tool measures elevation differences as small as 0.05 inches, which allows us to identify settlement patterns that are invisible to the naked eye.
Slab Structural Health We examine the concrete for “structural integrity” to ensure it can withstand the lift. If a slab is shattered into small pieces (often called “alligator cracking”) or has crumbled due to salt damage, lifting it might not be possible. Replacement is sometimes the smarter financial move in those severe cases.
Soil Indicators and Mechanics In the US, expansive soils cause billions in damage to residential properties annually, often rivaling flood damage costs. We look for specific signs of this soil movement, distinguishing between “heaving” (upward movement caused by swelling clay) and true “settlement” (downward sinking). Leveling fixes settlement; it cannot fix heaving caused by tree roots or swelling clay.
Advanced Void Detection Experienced technicians use a sounding rod or hammer to tap the slab surface. A hollow, drum-like sound indicates a void where the soil has washed away, while a solid “thud” indicates good contact. Some advanced audits may even utilize Ground Penetrating Radar (GPR) to visualize these voids without drilling a single hole.
Root Cause Identification Fixing the symptom without finding the cause is a waste of money. Common culprits we identify include:
- Poorly compacted fill dirt from the original construction.
- Water washout from misdirected downspouts or unsealed joints.
- Rodent tunneling under the slab.
- Erosion from a cracked water line.
Identifying these issues prevents the problem from returning.
Step 2: Project Planning and Hole Placement
Once we confirm that the slab is a good candidate for leveling, we design the injection grid. This involves calculating the load distribution and determining the optimal flow path for the slurry.
Drill Hole Placement Strategy
Hole placement is a geometry problem that relies on the concept of the “cone of influence.” We typically use a checkerboard or grid pattern spaced 3 to 5 feet apart. This ensures the slurry spreads evenly under the slab rather than lifting just one corner and cracking the concrete.
Key placement rules we follow:
- Distance from Edge: We drill at least 6 to 12 inches away from the edge of the slab. Drilling too close can cause the corner to shear off under pressure.
- Void Targeting: We place primary injection ports directly over the hollowest areas identified during the assessment.
- Joint Management: We plan holes near expansion joints to ensure adjacent slabs lift in unison, eliminating trip hazards.
Strategic vs. Random Drilling
| Feature | Strategic Grid Pattern | Random Hole Placement |
|---|---|---|
| Support | Uniform support across the entire slab. | Weak spots and potential future cracking. |
| Lift Control | Precise, level lifting. | Unpredictable tilting or “seesawing.” |
| Aesthetics | Symmetrical, professional look. | Haphazard appearance. |
For a standard 10-by-12-foot driveway section, we typically plan for 4 to 8 injection holes. This strategic density ensures even support without turning your driveway into Swiss cheese.
We mark every single location with chalk before we touch a tool. You can walk the job with us and approve the layout before drilling begins.
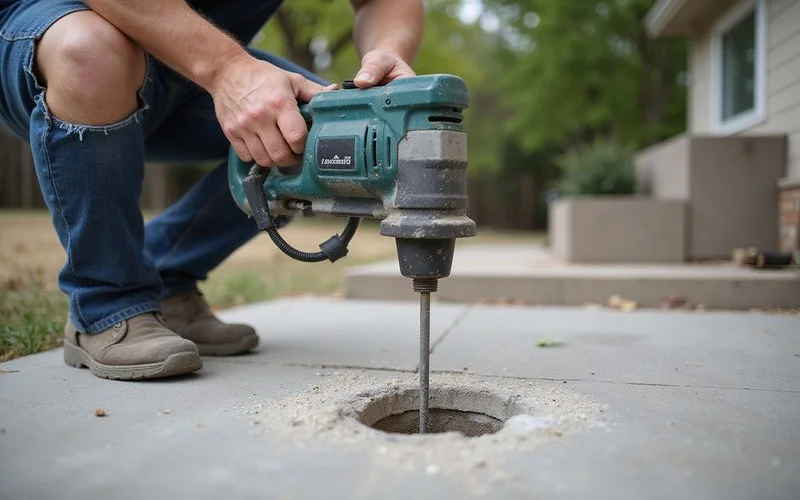
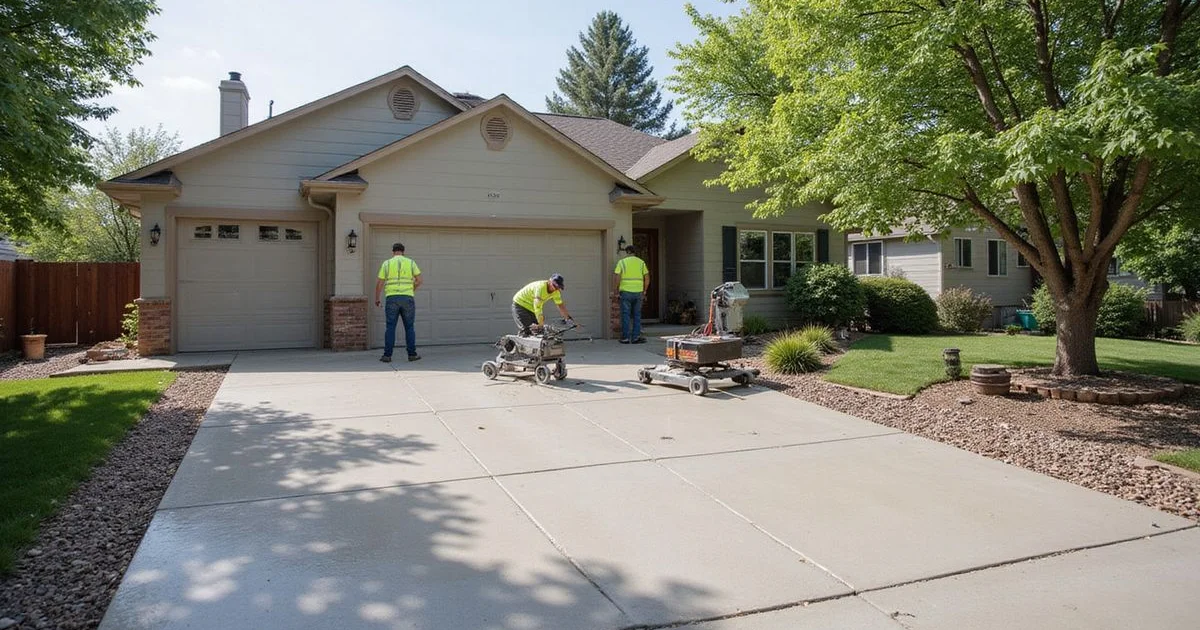
Step 3: Drilling Access Holes
We use a professional-grade core drill, often a model like the Hilti DD 150-U or Husqvarna DM 230, equipped with a diamond-tipped bit. This is a crucial distinction from a standard hammer drill. A core drill cuts a smooth cylinder of concrete, whereas a hammer drill can chip and spall the surface.
The Drilling Specs
Hole Diameter Our method uses a precise 1-inch diameter hole. This is significantly smaller than the old-school 2-inch holes used in traditional mudjacking but large enough to allow thick, structural slurry to flow freely.
OSHA-Compliant Dust Containment We adhere strictly to OSHA Standard 29 CFR 1926.1153 regarding respirable crystalline silica. By attaching a high-efficiency HEPA vacuum system directly to the drill shroud, we capture 99% of the concrete dust before it becomes airborne. This keeps your porch, siding, and landscaping clean while protecting everyone’s lungs.
Drilling Depth Control We drill through the slab only. The moment the bit breaks through the bottom of the concrete (usually 4 to 6 inches down), we stop. This prevents drilling into the soil and clogging the injection port.
The 1-inch hole is the “Goldilocks” size. It is small enough to be unobtrusive once patched but large enough to pump a material that contains real aggregate for lasting support.
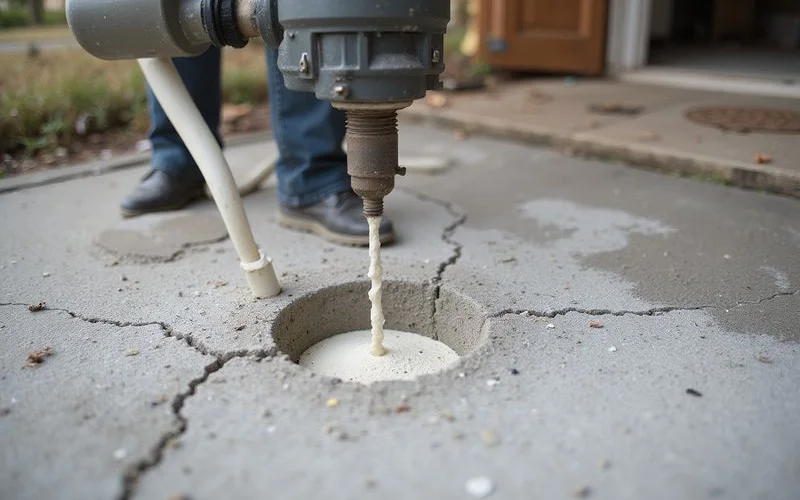
Step 4: Void Filling and Slab Lifting
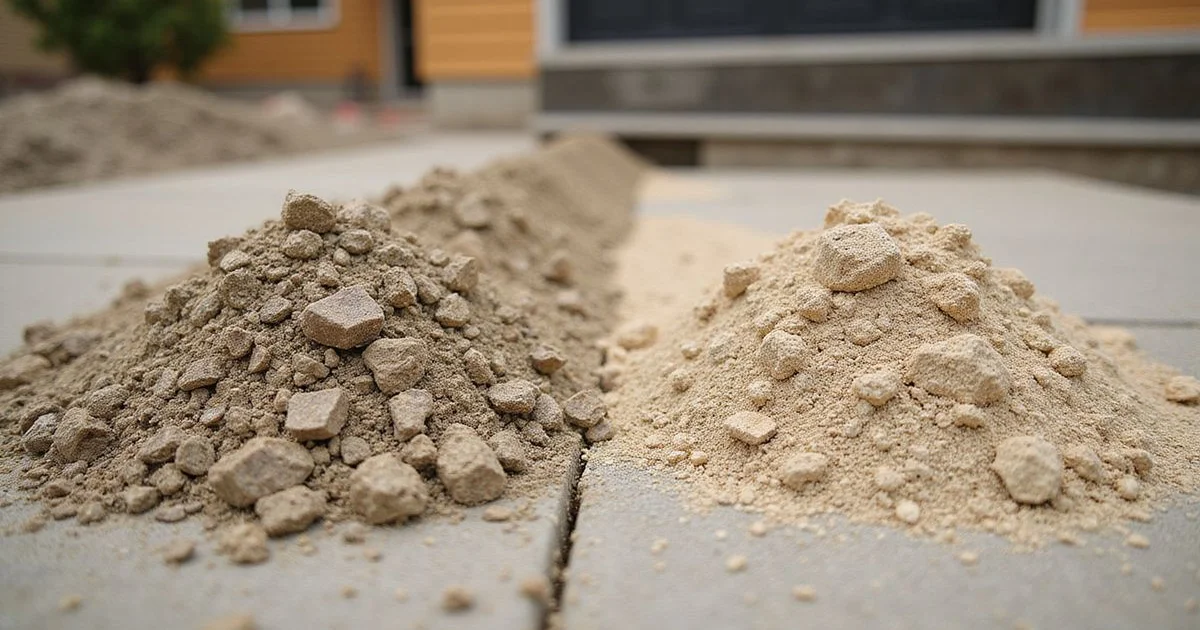
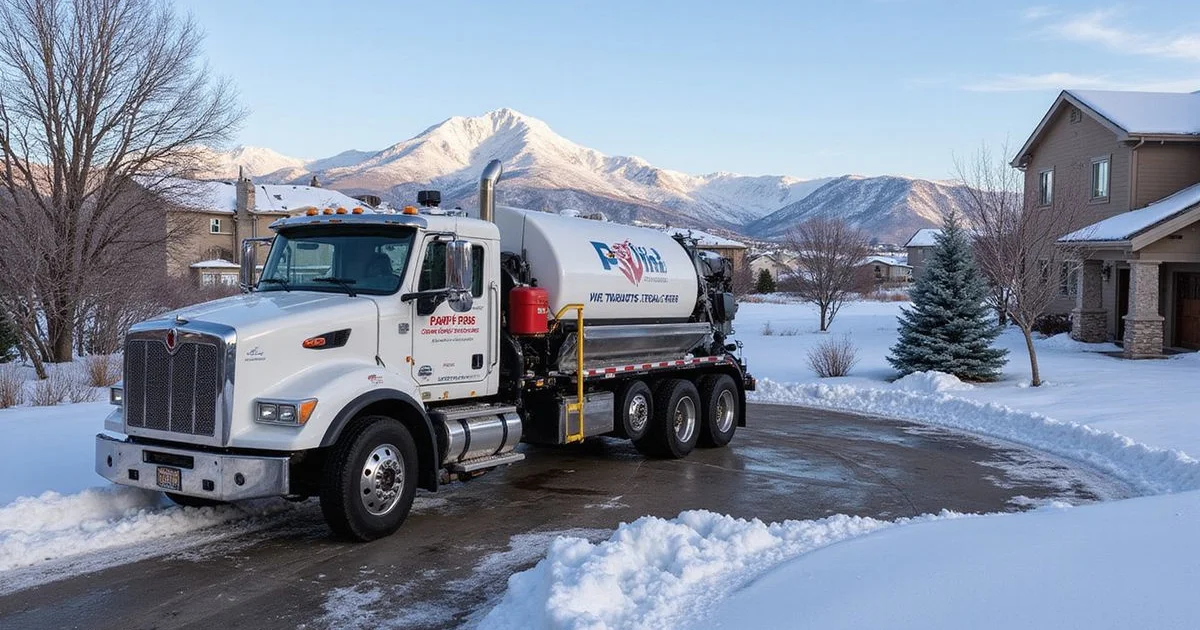
This is the engine of the operation. We pump our limestone slurry—a mix of crushed limestone, Portland cement, and water—through the holes using a specialized hydraulic pump, such as a ChemGrout system.
The Injection Physics
The pump delivers material at a controlled line pressure, typically between 20 and 50 PSI. This low-pressure approach is gentle on the slab compared to the violent expansion of some chemical foams.
Visual Lift Tracking We place a laser level or string line across the transition point. As the material flows in, we watch for the slab to move in millimeter increments.
Hydraulic Lift Mechanics The slurry doesn’t just fill the hole; it spreads out laterally to fill the void. Once the void is full, the pressure builds up and pushes against the underside of the slab. Since the ground won’t move, the slab has nowhere to go but up.
Auditory Feedback The pump operator listens to the machine. A deepening of the engine tone indicates resistance, meaning the void is filling. A sudden drop in pressure might mean the material is escaping out the side of the slab (a “blowout”), requiring an immediate stop.
Material Volume Tracking We track exactly how much material goes into each hole. If a 4-foot section takes 100 pounds of material, we know there was a massive void that was compromising your driveway’s strength.
The injection process for a typical residential slab takes 20 to 45 minutes. Watching the concrete rise is often the highlight for homeowners. It moves slowly enough to be safe but fast enough to see the progress in real-time.
Step 5: Fine-Tuning and Level Verification
Getting the slab “up” is easy; getting it perfectly level requires finesse. Once the slab is within striking distance of the target height, we switch to fine-tuning mode using digital levels like the SmartTool, which measure slopes to the tenth of a degree.
Precision adjustments include:
- Feathering the Pressure: We pulse the pump to lift the slab in tiny increments, often 1/16th of an inch at a time.
- Trip Hazard Elimination: The Americans with Disabilities Act (ADA) defines a trip hazard as any vertical change over 1/4 inch. This is especially critical for sidewalk and walkway leveling projects. We aim for zero flushness, but our internal standard is strictly within 1/8th of an inch.
- Drainage Verification: We check that the slope is correct. A perfectly level slab is actually bad if it traps water. We ensure a slope of at least 1% (roughly 1/8 inch per foot) away from your home’s foundation to prevent water damage.
This precision is a major advantage of hydraulic injection. We can stop the lift instantly by cutting the pressure, giving us total control over the final elevation.
Step 6: Hole Patching and Cleanup
After the lift is verified, we remove the injection ports. We then clean the holes to a depth of about 2 inches to prepare them for the patch.
The Patching Protocol
Material Selection We use a high-strength, non-shrink grout or rapid-set cement, such as Rapid Set Cement All. This material typically reaches a compressive strength of 4,000+ PSI, making the patch harder than the surrounding concrete.
Texture and Finish We don’t just smear it in. We trowel the surface to match the texture of your existing driveway, whether it’s a broom finish or a smooth float.
Color Blending Strategy Concrete lightens as it cures. We mix our patch material to match the aged color of your driveway, not the color of new wet cement. A pro tip we use is to rub a little dry concrete dust from the drilling process onto the wet patch, which helps it blend seamlessly with the surrounding gray.
We finish by power washing the work area. Our goal is to leave no trace other than the level concrete.
Step 7: Curing and Use Timeline
One of the biggest questions we get is, “When can I drive on it?” The answer depends on the material’s cure curve and the ambient temperature.
Strength Development Our limestone slurry reaches about 70 percent of its final hardness within 24 hours. It eventually cures to a compressive strength of roughly 2,400 PSI, which is comparable to residential concrete. This provides a solid, rock-hard base that won’t squish or settle under the weight of an SUV.
Weather Considerations Temperature matters for the cure. The ideal range for this work is between 50°F and 77°F. If the temperature drops below 40°F, we may add specific accelerators to the mix to ensure it sets properly without freezing.
Limestone Slurry vs. Polyjacking Performance
| Feature | Limestone Slurry | Polyurethane Foam |
|---|---|---|
| Compressive Strength | 2,400 PSI (Rock Hard) | ~100 PSI (Firm Foam) |
| Load Bearing | Heavy Duty (Trucks/RVs) | Light/Medium Duty |
| Cure Time | 24 Hours | 15 Minutes |
| Hole Size | 1 Inch | 5/8 Inch |
Recommended Use Timeline:
- Foot Traffic: Safe immediately. You can walk on the patches 30 minutes after we leave.
- Passenger Vehicles: Safe after 24 hours.
- Heavy Trucks/RVs: Wait 48 to 72 hours.
This 24-hour window allows the cement in the slurry to hydrate and bond, ensuring the new base is locked in place.
Step 8: Follow-Up and Warranty
We believe in the longevity of our work. That is why we schedule a follow-up check or call regarding the project.
Our warranty covers:
- Re-settlement: If the slab sinks more than 1/4 inch within our warranty period (typically 2 years).
- Material Failure: If the patch material cracks or pops out.
To maximize longevity, we recommend combining leveling with concrete caulking and surface sealing for complete protection. Industry data suggests that professionally leveled concrete has a re-settlement rate of less than 5% when the root cause (like water drainage) is addressed. Our local claim rate is even lower, hovering around 3%, which speaks to the stability of the limestone method.
Project Timeline Summary
| Phase | Duration |
|---|---|
| Assessment & Setup | 30-45 minutes |
| Drilling | 15-30 minutes |
| Injection & Lifting | 30-60 minutes |
| Patching & Cleanup | 20-30 minutes |
| Total On-Site Time | 2 - 3.5 hours |
| Driveable Time | 24 hours |
Most residential projects are completed in a single morning. Compare this to a full replacement, which requires jackhammering, hauling debris, framing, pouring, and a 7-day cure time before you can use your driveway again.
Ready to See How It Works on Your Property?
Understanding the process removes the mystery. The next logical step is to see if your specific settlement issues can be solved with this method. We provide free on-site assessments where we use our altimeters and experience to give you a clear, honest recommendation. Visit our driveway leveling services page to check our availability, or contact us directly to get your project on the schedule. With thousands of successful lifts across Colorado, we have the tools and the team to get your concrete back on solid ground.